Category: CoderDojo

Minetest client install

THIS PAGE HAS BEEN SUPERCEDED BY Pythonator at QSITE WHICH HAS UPDATED VERSIONS OF EVERY PIECE OF SOFTWARE DESCRIBED HERE!

At CoderDojo this term we will be learning to program in Python 3 to build structures in a Minetest world. Minetest is a free, open-source, high performance Minecraft clone that is easily modded. There already exist mods which allow chat commands to be executed over IRC (Internet Relay Chat). I have created a Minetest mod (irc_builder) to add chat commands allowing us to build structures using those commands. I have also created a python module (ircbuilder) which sends commands through IRC to the Minetest world.

To set up a client computer you only need install three things:

  1. Python 3
  2. PyCharm Edu v2017.3
  3. Minetest v0.4.16

Python 3

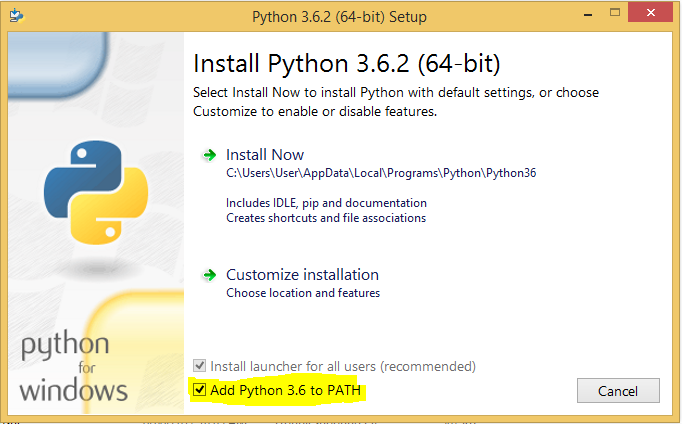
Windows or Mac: From the Python website download Python 3.6.4 or later. Install it using the default settings, plus select “Add Python 3.6 to PATH” which is unticked by default.

Linux:

sudo apt install python3 # Debian, Ubuntu
sudo yum install python3     # Red Hat, Fedora, Centos

PyCharm Edu

PyCharm Edu is a free open source integrated development environment (IDE) for Python, better than IDLE which comes with Python. It also can guide students through a course of lessons and tasks, providing hints and checking on tprogress automatically.

Windows, Mac, Linux: Download PyCharm Edu v2017.3 or later from the Jetbrains website. Install using defaults. The courses will be provided as zip files with the names

Ninja_1_countdowns_and_number_guessing
Ninja_2_minetest_course_v6
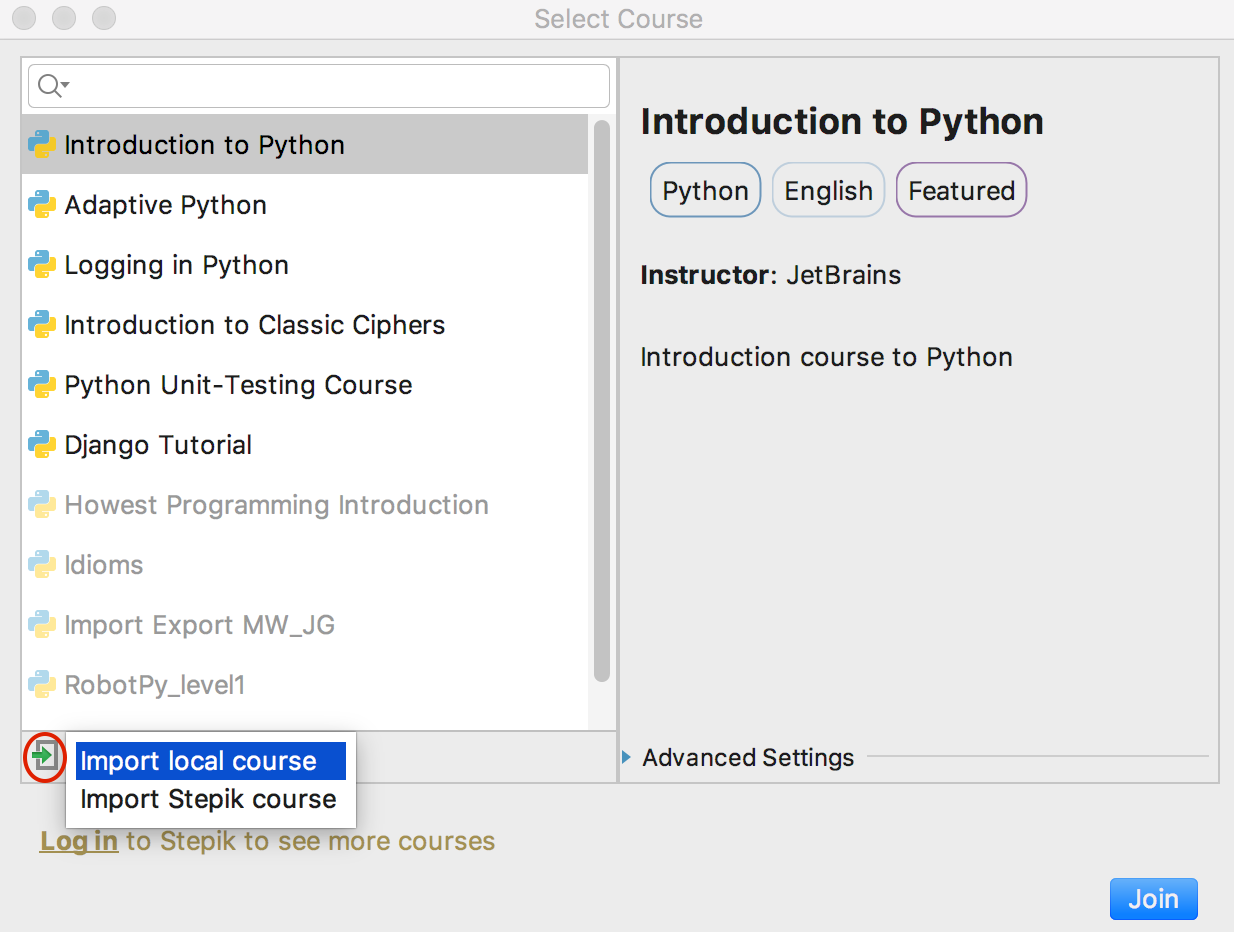
To open a course

File menu > Browse Courses > Click the green arrow > Import local course > Select one of the above two files > Click Join

Minetest

You can install minetest client without any mods as server mods only need to be installed on the server and then every client can use them.

Windows 64 bit

Download Minetest v0.4.16 (portable 64  bit) from the Minetest website. Extract the zip file to your Documents folder. The program can be run by double clicking on Documents\minetest-0.4.16-win64\bin\minetest.exe

Windows 32 bit

Download Minetest v0.4.16 (portable 32  bit MSVC) from the Minetest website. Extract the zip filet to your Documents folder. The program can be run by double clicking on Documents\minetest-0.4.16-win32-msvc\bin\minetest.exe

Mac

The Mac version of Minetest needs to be installed using Terminal (Applications/Utilities). If you haven’t installed brew, install it first with (one line):

/usr/bin/ruby -e "$(curl -fsSL https://raw.githubusercontent.com/Homebrew/install/master/install)"

Then install minetest from Terminal with:

brew cask install xquartz
brew install minetest

Minetest can be run by double clicking /usr/local/opt/minetest/minetest.app or from Terminal with:

/usr/local/opt/minetest/minetest.app/Contents/MacOS/minetest
Linux
sudo apt install minetest # Debian, Ubuntu
sudo yum install minetest     # Red Hat, Fedora, Centos

Minetest can be run by typing minetest on command line.

Categories: CoderDojo, Minetest

Python in Minecraft 10 – functions and modules

Importing modules

In the previous python in minecraft blog we created a program to construct an east-west tunnel. This is a useful program which we might want to use often. We can put the program into a function and save the function in a module so it can be used by other programs. We will call the function “buildEastTunnel()”. The module name will be just the name of the file, which in this case we will call “tunnel.py”. Then whenever we want to build a tunnel running east west, we can import the module just like we have been importing mcpi.minecraft and mcpi.block.

There are several ways to import functions. The simplest method imports the module but not the function name. We still need to tell python to look in that module when calling the function

import tunnel
tunnel.buildEastTunnel()

If you want to give the module a better name you can use “as” to assign a new name. This is what we do when importing mcpi.minecraft as minecraft.

import tunnel as mole
mole.buildEastTunnel()

If you want to use the function without qualifying it with the module name each time, you can import the function explicitly from the module.

from tunnel import buildEastTunnel
buildEastTunnel()

Function parameters

Now calling buildEastTunnel() as it is currently written will always construct a tunnel in the same place, x = -400 to -200, y = 72 at each end, z = 244. However, if we design the function to take parameters then when we call the function we can specify where the tunnel is built.

# tunnel.py
def buildEastTunnel(mc, x1, x2, y1, y2, z):
    """Builds an east-west tunnel (in the x direction)"""
    # rest of function ...

# example10.py
import mcpi.minecraft as minecraft
from tunnel import buildEastTunnel
mc = minecraft.Minecraft.create()
buildEastTunnel(mc, 0, 200, 75, 75, 233)

This example passes the mc object to the function so it knows which minecraft server to build the tunnel in. Then it gets the x, y and z coordinates at each end of the tunnel. Because the tunnel is running east-west there is only one z value required. Our code is designed to go from xmin to xmax but someone calling our function might put the higher value of x first and the lower value second or vice versa. We can take advantage of python’s ability to assign several variables at once to ensure xmin is less than xmax.

def buildEastTunnel(mc, x1, x2, y1, y2, z):
    """Builds an east-west tunnel (in the x direction)"""
    if x1 < x2:
        xmin, yatxmin, xmax, yatxmax = x1, y1, x2, y2
    else:
        xmin, yatxmin, xmax, yatxmax = x2, y2, x1, y1
    # rest of function ...

When designing a function to take parameters, it is possible to specify some parameters as “required” and other parameters as “optional”. Optional parameters need to be given a default value. In our example it would be useful for the y values to use ground level if it is not supplied. “Required” parameters have to come before “optional” parameters so the parameters list should now be (mc, x1, x2, z, y1, y2).

def buildEastTunnel(mc, x1, x2, z, y1=None, y2=None):
    """Builds an east-west tunnel (in the x direction)"""
    if x1 < x2:
        xmin, yatxmin, xmax, yatxmax = x1, y1, x2, y2
    else:
        xmin, yatxmin, xmax, yatxmax = x2, y2, x1, y1
    if yatxmin == None:
        yatxmin = getGroundHeight(mc, xmin, z)
    if yatxmax == None:
        yatxmax = getGroundHeight(mc, xmax, z)
    # rest of function ...

Finding ground height

We are calling a function getGroundHeight(mc,x,z) which we haven’t written yet. In mcpi.minecraft is a function mc.getHeight(x,z) which finds the highest block which is not air at x and z coordinates. Unfortunately that block will often be a tree or sapling. Here is a function which corrects mc.getHeight(x,z) for trees. It makes use of the mc.getBlock(x,y,z) function which returns the id of the block at those coordinates.

def getGroundHeight(mc, x, z):
    """finds heighest non air block which is also not a tree or sapling"""
    LEAVES2 = block.Block(161)
    y = mc.getHeight(x, z)
    while mc.getBlock(x, y, z) in (block.AIR.id, block.LEAVES.id, block.WOOD.id, LEAVES2.id, block.SAPLING.id):
        y -= 1
    return y
Categories: CoderDojo, Minecraft

Moon lander with autopilot in python

In the previous example, the user was the pilot. See if you can design an autopilot which will land the lunar landing module on the moon. You need to design a function which calculates a new burn value based on available data, altitude, speed, gravity. Here is my simple example.

    burn=20
    if speed + gravity > 2 * impact:
        burn = 10 * (speed + gravity - (impact) * 2)
    if impact < 2:
        burn = 10 * (2 * speed + gravity - altitude)

It is a bit erratic but lands properly at the end. See if you can develop a formula which has a smoother burn control.

Altitude=1000.000 Speed=30.000 Fuel=1500.000 Impact=33.333 Previous burn= 0.000
Altitude= 970.000 Speed=29.622 Fuel=1480.000 Impact=32.746 Previous burn=20.000
Altitude= 940.378 Speed=29.244 Fuel=1460.000 Impact=32.156 Previous burn=20.000
Altitude= 911.134 Speed=28.866 Fuel=1440.000 Impact=31.564 Previous burn=20.000
Altitude= 882.268 Speed=28.488 Fuel=1420.000 Impact=30.970 Previous burn=20.000
Altitude= 853.780 Speed=28.110 Fuel=1400.000 Impact=30.373 Previous burn=20.000
Altitude= 825.670 Speed=27.732 Fuel=1380.000 Impact=29.773 Previous burn=20.000
Altitude= 797.938 Speed=27.354 Fuel=1360.000 Impact=29.171 Previous burn=20.000
Altitude= 770.584 Speed=26.976 Fuel=1340.000 Impact=28.566 Previous burn=20.000
Altitude= 743.608 Speed=26.598 Fuel=1320.000 Impact=27.957 Previous burn=20.000
Altitude= 717.010 Speed=26.220 Fuel=1300.000 Impact=27.346 Previous burn=20.000
Altitude= 690.790 Speed=25.842 Fuel=1280.000 Impact=26.731 Previous burn=20.000
Altitude= 664.948 Speed=25.464 Fuel=1260.000 Impact=26.113 Previous burn=20.000
Altitude= 639.484 Speed=25.086 Fuel=1240.000 Impact=25.492 Previous burn=20.000
Altitude= 614.398 Speed=24.708 Fuel=1220.000 Impact=24.866 Previous burn=20.000
Altitude= 589.690 Speed=24.330 Fuel=1200.000 Impact=24.237 Previous burn=20.000
Altitude= 565.360 Speed=23.952 Fuel=1180.000 Impact=23.604 Previous burn=20.000
Altitude= 541.408 Speed=23.574 Fuel=1160.000 Impact=22.966 Previous burn=20.000
Altitude= 517.834 Speed=23.196 Fuel=1140.000 Impact=22.324 Previous burn=20.000
Altitude= 494.638 Speed=22.818 Fuel=1120.000 Impact=21.678 Previous burn=20.000
Altitude= 471.820 Speed=22.440 Fuel=1100.000 Impact=21.026 Previous burn=20.000
Altitude= 449.380 Speed=22.062 Fuel=1080.000 Impact=20.369 Previous burn=20.000
Altitude= 427.318 Speed=21.684 Fuel=1060.000 Impact=19.707 Previous burn=20.000
Altitude= 405.634 Speed=21.306 Fuel=1040.000 Impact=19.038 Previous burn=20.000
Altitude= 384.328 Speed=20.928 Fuel=1020.000 Impact=18.364 Previous burn=20.000
Altitude= 363.400 Speed=20.550 Fuel=1000.000 Impact=17.684 Previous burn=20.000
Altitude= 342.850 Speed=20.172 Fuel= 980.000 Impact=16.996 Previous burn=20.000
Altitude= 322.678 Speed=19.794 Fuel= 960.000 Impact=16.302 Previous burn=20.000
Altitude= 302.884 Speed=19.416 Fuel= 940.000 Impact=15.600 Previous burn=20.000
Altitude= 283.468 Speed=19.038 Fuel= 920.000 Impact=14.890 Previous burn=20.000
Altitude= 264.430 Speed=18.660 Fuel= 900.000 Impact=14.171 Previous burn=20.000
Altitude= 245.770 Speed=18.282 Fuel= 880.000 Impact=13.443 Previous burn=20.000
Altitude= 227.488 Speed=17.904 Fuel= 860.000 Impact=12.706 Previous burn=20.000
Altitude= 209.584 Speed=17.526 Fuel= 840.000 Impact=11.958 Previous burn=20.000
Altitude= 192.058 Speed=17.148 Fuel= 820.000 Impact=11.200 Previous burn=20.000
Altitude= 174.910 Speed=16.770 Fuel= 800.000 Impact=10.430 Previous burn=20.000
Altitude= 158.140 Speed=16.392 Fuel= 780.000 Impact= 9.647 Previous burn=20.000
Altitude= 141.748 Speed=16.014 Fuel= 760.000 Impact= 8.852 Previous burn=20.000
Altitude= 125.734 Speed=15.636 Fuel= 740.000 Impact= 8.041 Previous burn=20.000
Altitude= 110.098 Speed=16.083 Fuel= 728.246 Impact= 6.846 Previous burn=11.754
Altitude=  94.015 Speed=13.692 Fuel= 688.115 Impact= 6.867 Previous burn=40.131
Altitude=  80.324 Speed=13.733 Fuel= 672.314 Impact= 5.849 Previous burn=15.802
Altitude=  66.590 Speed=11.698 Fuel= 635.736 Impact= 5.693 Previous burn=36.577
Altitude=  54.893 Speed=11.385 Fuel= 616.393 Impact= 4.821 Previous burn=19.343
Altitude=  43.508 Speed= 9.643 Fuel= 582.748 Impact= 4.512 Previous burn=33.645
Altitude=  33.865 Speed= 9.024 Fuel= 560.339 Impact= 3.753 Previous burn=22.409
Altitude=  24.841 Speed= 7.506 Fuel= 528.936 Impact= 3.310 Previous burn=31.403
Altitude=  17.335 Speed= 6.619 Fuel= 503.853 Impact= 2.619 Previous burn=25.083
Altitude=  10.716 Speed= 5.238 Fuel= 473.818 Impact= 2.046 Previous burn=30.035
Altitude=   5.478 Speed= 4.092 Fuel= 446.138 Impact= 1.339 Previous burn=27.680
Altitude=   1.386 Speed= 1.386 Fuel= 402.864 Impact= 1.000 Previous burn=43.274
Altitude=   0.000 Speed= 0.000 Fuel= 372.780 Last burn=30.084
You have landed

Here is the full code

# moonlanderautopilot.py
# this game simulates a lunar landing module (LLM) landing on the moon
# The programmer is the autopilot and needs to control how much fuel is burnt in the
# retro rockets so that the descent speed slows to zero just as the
# altitude above the moon's surface reaches zero. If it impacts the moon
# more than 5 m below the surface, or your speed on impact is
# greater than 5 m/s then it has crashed.
# Otherwise it is considered to be a 'good' landing.
# If it runs out of fuel, LLM will accelerate towards moon by gravity.

# set up the initial parameters
speed = 30      # speed approaching the moon
fuel = 1500     # how much fuel is left
altitude = 1000 # altitude above moon
gravity = 1.622 # acceleration due to gravity
burn = 0        # initial rate of burning fuel in retrorockets

# while LLM is above the moon's surface,
# calculate flight data and take input from pilot
while altitude > 0:
    # calculate how long until LLM will impact moon at current speed (impact)
    if speed <= 0:
        impact = 1000
    else:
        impact = altitude / speed
    # display flight data
    print("Altitude={:8.3f} Speed={:6.3f} Fuel={:8.3f} Impact={:6.3f} Previous burn={:6.3f}".format(altitude,speed,fuel,impact,burn))
    # let autopilot calculate the new burn rate
    burn=20
    if speed + gravity > 2 * impact:
        burn = 10 * (speed + gravity - (impact) * 2)
    if impact < 2:
        burn = 10 * (2 * speed + gravity - altitude)
    # ensure rate of fuel burning is within rocket's capability and doesn't exceed remaining fuel
    if burn < 0:
        burn = 0
    if burn > 50:
        burn = 50
    if burn > fuel:
        burn = fuel
    #calculate new flight data
    altitude -= speed
    speed += gravity - burn/10
    fuel -= burn
# loop has ended so we must have hit moon's surface
# display final flight data and assess whether it was a crash or a good landing
print("Altitude={:8.3f} Speed={:6.3f} Fuel={:8.3f} Last burn={:6.3f}".format(altitude,speed,fuel,burn))
if altitude <- 5 or speed > 5:
    print("You have crashed")
else:
    print("You have landed")
Categories: CoderDojo

Moon lander game in python

Floating point numbers, called floats in python, are numbers which have a decimal point and sometimes digits after the decimal point. They are different to integers which represent whole numbers and do not have a decimal point. You can display the type of values or variables using the type() function. The following example displays the type of several values. In python 3, the division operation / always returns a float.

>>> type(3)
<class 'int'>
>>> type(3.14)
<class 'float'>
>>> type(3.0)
<class 'float'>
>>> type(6/2)
<class 'float'>

Printing floats can be messy because python prints as many decimal places as it thinks it needs up to about 16 significant figures. However python provides several methods of formatting floats to improve output. We will look at the .format() method which can be applied to any string and can be used to format all data types. It produces a new string which can be printed or saved to a file or stored in a variable for later use or passed to another function. .format() uses {} placeholders in a string to insert values of variables in the new string. Inside these curly braces you can specify details such as which value from the arguments (before the :), how wide the string is (integer just after the :), how many decimal places to show after the decimal point (for example .3f includes 3 decimal places after the decimal point of a float. Hence, to include the value of altitude to 3 decimal places in a new string we use

'Altitude = {:.3f}'.format(altitude)

which returns a string 'Altitude=970.000'

A width can be provided immediately following the :. To format and print several values in the same string, provided in the correct order in format, we have the following example:

print("Altitude={:8.3f} Speed={:6.3f} Fuel={:8.3f} Impact={:6.3f} Previous burn={:6.3f}".format(altitude,speed,fuel,impact,burn))

which prints the following:

Altitude= 970.000 Speed=29.422 Fuel=1478.000 Impact=32.969 Previous burn=22.000

This exercise also demonstrates the benefits of comments in python code. Comments are not interpreted by python and do not affect the program at all. However, they make it much easier for other people, or even yourself a few weeks later, understand what the program is supposed to do. All comments start with a #. Here is a game to pilot the lunar landing module onto the moon. Read the comments to work out what you need to do and then give it a go. See if you can work out how it works.

# moonlander.py
# this game simulates a lunar landing module (LLM) landing on the moon
# you are the pilot and need to control how much fuel you burn in the
# retro rockets so that your descent speed slows to zero just as your
# altitude above the moon's surface reaches zero. If you impact the moon
# more than 5 m below the surface, or your speed on impact is
# greater than 5 m/s then you have considered to have crashed.
# Otherwise it is considered to be a 'good' landing.
# If you run out of fuel, LLM will accelerate towards moon by gravity.

# set up the initial parameters
speed = 30      # speed approaching the moon
fuel = 1500     # how much fuel is left
altitude = 1000 # altitude above moon
gravity = 1.622 # acceleration due to gravity
burn = 0        # initial rate of burning fuel in retrorockets

# while LLM is above the moon's surface,
# calculate flight data and take input from pilot
while altitude > 0:
    # calculate how long until LLM will impact moon at current speed (impact)
    if speed <= 0:
        impact = 1000
    else:
        impact = altitude / speed
    # display flight data
    print("Altitude={:8.3f} Speed={:6.3f} Fuel={:8.3f} Impact={:6.3f} Previous burn={:6.3f}".format(altitude,speed,fuel,impact,burn))
    # take input from pilot
    burn = float(input("Enter fuel to burn (0-50)?"))
    # ensure rate of fuel burning is within rocket's capability and doesn't exceed remaining fuel
    if burn < 0:
        burn = 0
    if burn > 50:
        burn = 50
    if burn > fuel:
        burn = fuel
    #calculate new flight data
    altitude -= speed
    speed += gravity - burn/10
    fuel -= burn
# loop has ended so we must have hit moon's surface
# display final flight data and assess whether it was a crash or a good landing
print("Altitude={:8.3f} Speed={:6.3f} Fuel={:8.3f} Last burn={:6.3f}".format(altitude,speed,fuel,burn))
if altitude <- 5 or speed > 5:
    print("You have crashed")
else:
    print("You have landed")
Categories: CoderDojo

Factors of a number using python

This exercise is to find all the factors of a given number. Remember that a factor divides evenly into a number without leaving a remainder. We can use the modulo operator (%) to check for any remainder. The program will check all integers from 2 up to but not including the original number. To loop through those numbers we will use the for loop combined with the range() function.

number = int(input("Enter the number?"))
for i in range(2,number):
    remainder = number % i
    quotient = number // i
    print(number,"=",i,"x",quotient,"+ remainder",remainder)
    if remainder == 0:
        print("remainder is zero so",i,"is a factor")
    else:
        print("remainder is not zero so",i,"is not a factor")

Using print() in this way shows clearly the flow of the program. However, two lines of code for each potential factor is a lot to read through. To reduce the number of lines of code, print() lets us specify a different ending than a new line. If we specify end=’ ‘ then print() will end the line with a space rather than a new line significantly reducing the number of lines of output.

The following program ignores output when the number is not a factor, and displays all the factors on the same line, with a final message whether the original number is prime or composite. Instead of asking for the number to be entered, the program finds all factors for all numbers between 2 and 99 inclusive.

for number in range(2,100):
    print(number,'factors:', end=' ')
    prime=True
    for i in range(2,number):
        if number%i == 0:
            print(i, end=' ')
            prime=False
    if prime:
        print('prime')
    else:
        print('composite')
Categories: CoderDojo