Pythonator at QSITE
Pythonator makes Python coders out of gamers. It runs on a Minetest game server and comes with a companion PyCharm Edu course which teaches gamers how to overcome the obstacles in the game by writing Python programs.
A Pythonator workshop will be held at QSITE conference 2018. Attendees should bring a Windows, Mac or Linux laptop. Android and iPads are not suitable. If you don’t already have the following software installed, please install it prior to attending.
Also download the courses. Only the first course will be used during the workshop.
Send an email to tim@triptera.com.au to request a free account on the server. Then you can try out the exercises on the server for a few weeks after the completion of the conference.
Detailed installation – Windows 64 bit
Python 3
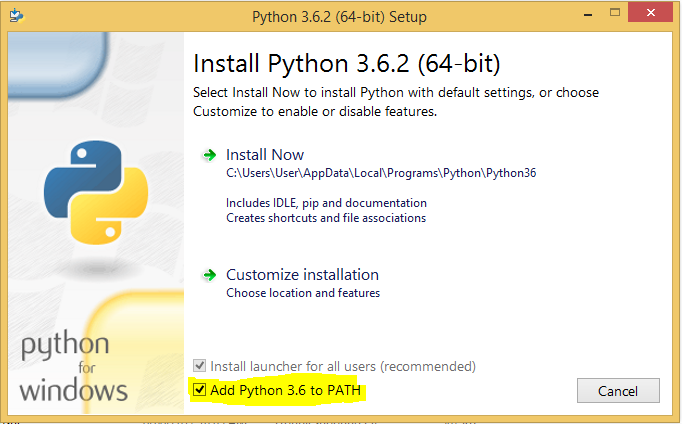
From the Python website download Python 3.6.5. Default settings are fine during the install although I recommend users also select “Add Python 3.6 to PATH” which is unticked by default.
PyCharm Edu 2018.1.2
Download and install PyCharm Edu v2018.1.2.
Download the Pythonator companion courses for PyCharm Edu. Do not unzip or extract the companion courses.
Minetest 0.4.17.1
- Download Minetest 0.4.17.1.
- Extract the zip file into your Documents directory so you have a folder Documents\minetest-0.4.17.1-win64.
- In File Explorer right-click on Documents\minetest-0.4.17.1-win64\bin\minetest.exe and select “Send to > Desktop (Create shortcut)”.
Now you can run Minetest by double-clicking the Minetest icon on your desktop.
Detailed installation – Mac
This section is for users of macOS 10.13 who are uncomfortable with using the command line. If you are comfortable using the command line, or running an older version of macOS, see the next section.
Python 3
From the Python website download and install Python 3.6.5. Default settings are fine during the install.
PyCharm Edu 2018.1.2
Download and install PyCharm Edu v2018.1.2.
Download the Pythonator companion courses for PyCharm Edu. Do not unzip or extract the companion courses. Safari users need to ensure Safari doesn’t ‘open “safe” files after downloading’ which automatically unzips these files. This is the bottom setting in the General tab of Safari Preferences…
Minetest 0.4.17.1
If you are running macOS 10.13 you can download a prebuilt version of minetest 0.4.17.1. To install, open the downloaded dmg file and drag the minetest icon on to the Applications icon. To run the first time right-click the minetest icon in Applications folder and click “Open”. There might be a security warning but you will then be able to click “Open” button.
Detailed installation – Mac (using the command line)
This section is for those comfortable with the Mac command line using Terminal application. I prefer installing using Homebrew because it matches the build of minetest to my version of macOS and it is easy to install updates.
Python 3 and Minetest
Type the following in Terminal to install XCode, Homebrew, Python 3 and Minetest if you have not installed them already.
xcode-select --install
/usr/bin/ruby -e "$(curl -fsSL https://raw.githubusercontent.com/Homebrew/install/master/install)"
brew install python
brew install minetest
open /usr/local/opt/minetest
The last line opens the installed minetest folder in Finder. Double-click the minetest icon. While minetest is running, right-click on the icon in the dock and select “Options > Keep in Dock” to make it easier to run next time.
PyCharm Edu 2018.1.2
Download and install PyCharm Edu v2018.1.2.
Download the Pythonator companion courses for PyCharm Edu. Do not unzip or extract the companion courses.
Detailed installation – Windows 32 bit
Python 3
From the Python website download Python 3.6.5. Default settings are fine during the install although I recommend users also select “Add Python 3.6 to PATH” which is unticked by default.
PyCharm Edu 2018.1.2
Download and install PyCharm Edu v2018.1.2.
Download the Pythonator companion courses for PyCharm Edu. Do not unzip or extract the companion courses.
pythonator_1_easy_minetest_v1.zip
pythonator_2_advanced_minetest_v1.zip
Minetest 0.4.17.1
- Download Minetest 0.4.17.1.
- Extract the zip file into your Documents directory so you have a folder Documents\minetest-0.4.17.1-win32.
- In File Explorer right-click on Documents\minetest-0.4.17.1-win32\bin\minetest.exe and select “Send to > Desktop (Create shortcut)”.
Now you can run Minetest by double-clicking the Minetest icon on your desktop.
Detailed installation – Ubuntu Linux
sudo add-apt-repository ppa:minetestdevs/stable
sudo apt install python3 python3-venv libcanberra-gtk-module minetest
sudo snap install pycharm-educational --classic
wget https://www.pythonator.com/download/pythonator_1_easy_minetest_v1.zip
wget https://www.pythonator.com/download/pythonator_2_advanced_minetest_v1.zip
To open a course in PyCharm Edu
File menu > Browse Courses > Click the green arrow > Import local course > Select one of the above two files > Click Join