Author: Tim Cummings

PyCharm Edu review

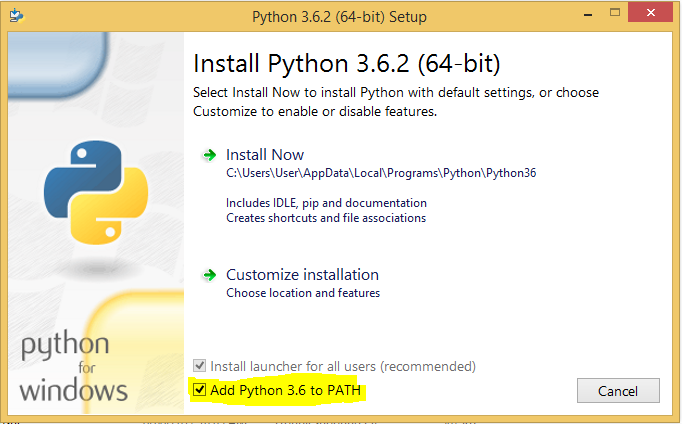
PyCharm Edu is an Integrated Development Environment (IDE) for python which has the additional ability to run courses for learning python programming. It also enables teachers to create those courses. PyCharm Edu is cross platform, running on Linux, Mac and Windows.

At CoderDojo I am mentoring ninjas in coding python so I thought I would try PyCharm Edu. To create a course, I created a series of tasks. Each task is a python program with sections left out to be completed by ninjas (answer placeholders). A task has a task description to explain to the ninjas what to do, and a series of tests to determine when they had completed the task. Each answer placeholder has hints to help solve it, some text which needs to be replaced by the ninja and even the correct answer. The tasks have to provide enough information for the ninja to understand what needed to be done, but not enough that the answer was trivial.

Writing the tests was challenging. The tests needed to check for all possible correct answers. For example, if the correct answer was “x+y” then I should also accept “y+x” or “y + x”. I solved this problem by using the python eval() or exec() to test the value of functions or the effect of statements rather than compare the exact characters typed to the answer.

For example, here is how I used eval() to test for where the correct formula should be (x+y).

def test_formula_1(ninja_answer):
    list_data = [{"x": 5, "y": 15}, {"x": 10, "y": -5}]
    global_data = {}
    correct_answer = "x+y"
    for data in list_data:
        try:
            guess = eval(ninja_answer, global_data, data)
        except NameError:
            failed("NameError: should only be in terms of variables " + ",".join(data.keys()) + " but includes other variables. Your formula: " + ninja_answer)
            return False
        correct = eval(correct_answer, global_data, data)
        if guess != correct:
            failed("Incorrect answer for data " + str(data) + ". Correct answer: " + str(correct) + ". Your answer: " + str(guess) + ". Your formula: " + ninja_answer)
            return False
    return True

The types of tests I used to check for correct answers were

  • Exact match – when a string value or number value had to be exact
  • Partial match – when only start of string or end of string important
  • Formula correct – using eval()
  • Statement correct – using exec()
  • Printed output correct
  • Effect of program – eg results in Minetest world

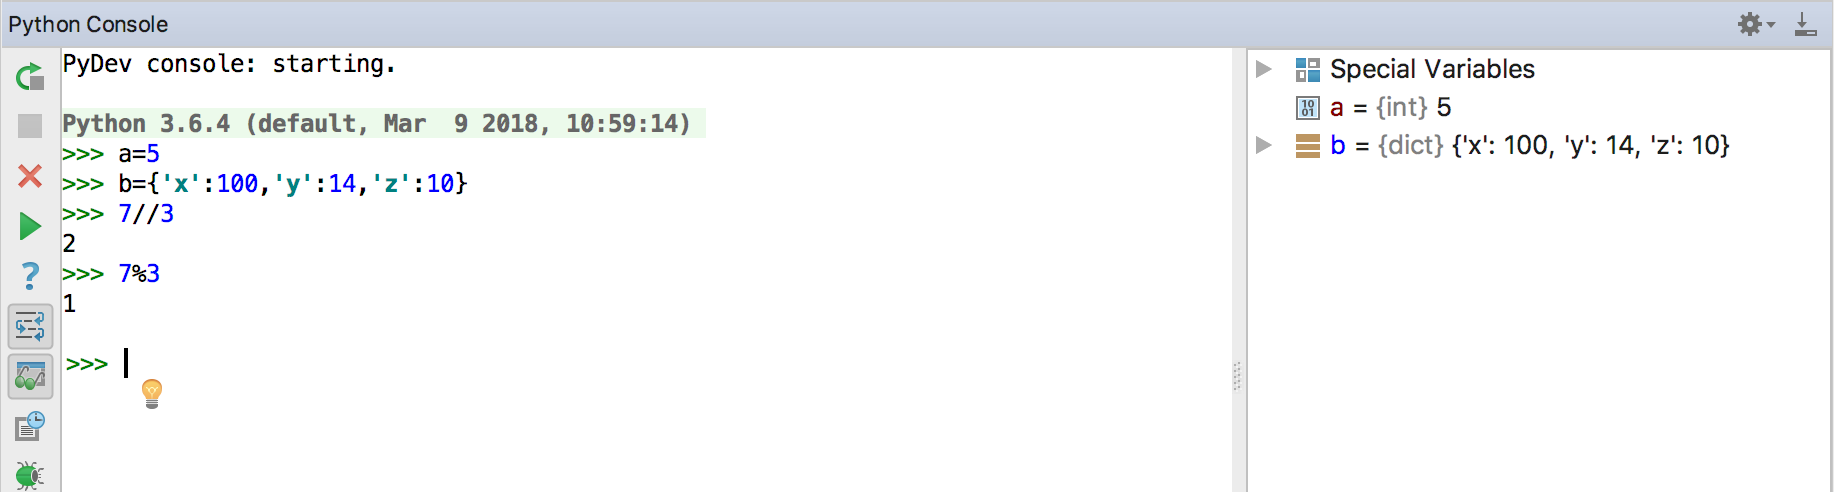
When the ninja (student) is running the course they have access to a full python IDE, including command completion and debugging. As a teaching aid one of the most useful features is the console where ninjas can test individual python statements. The console has a sub-window showing variables created in the console and their values, great for teaching how variables work.

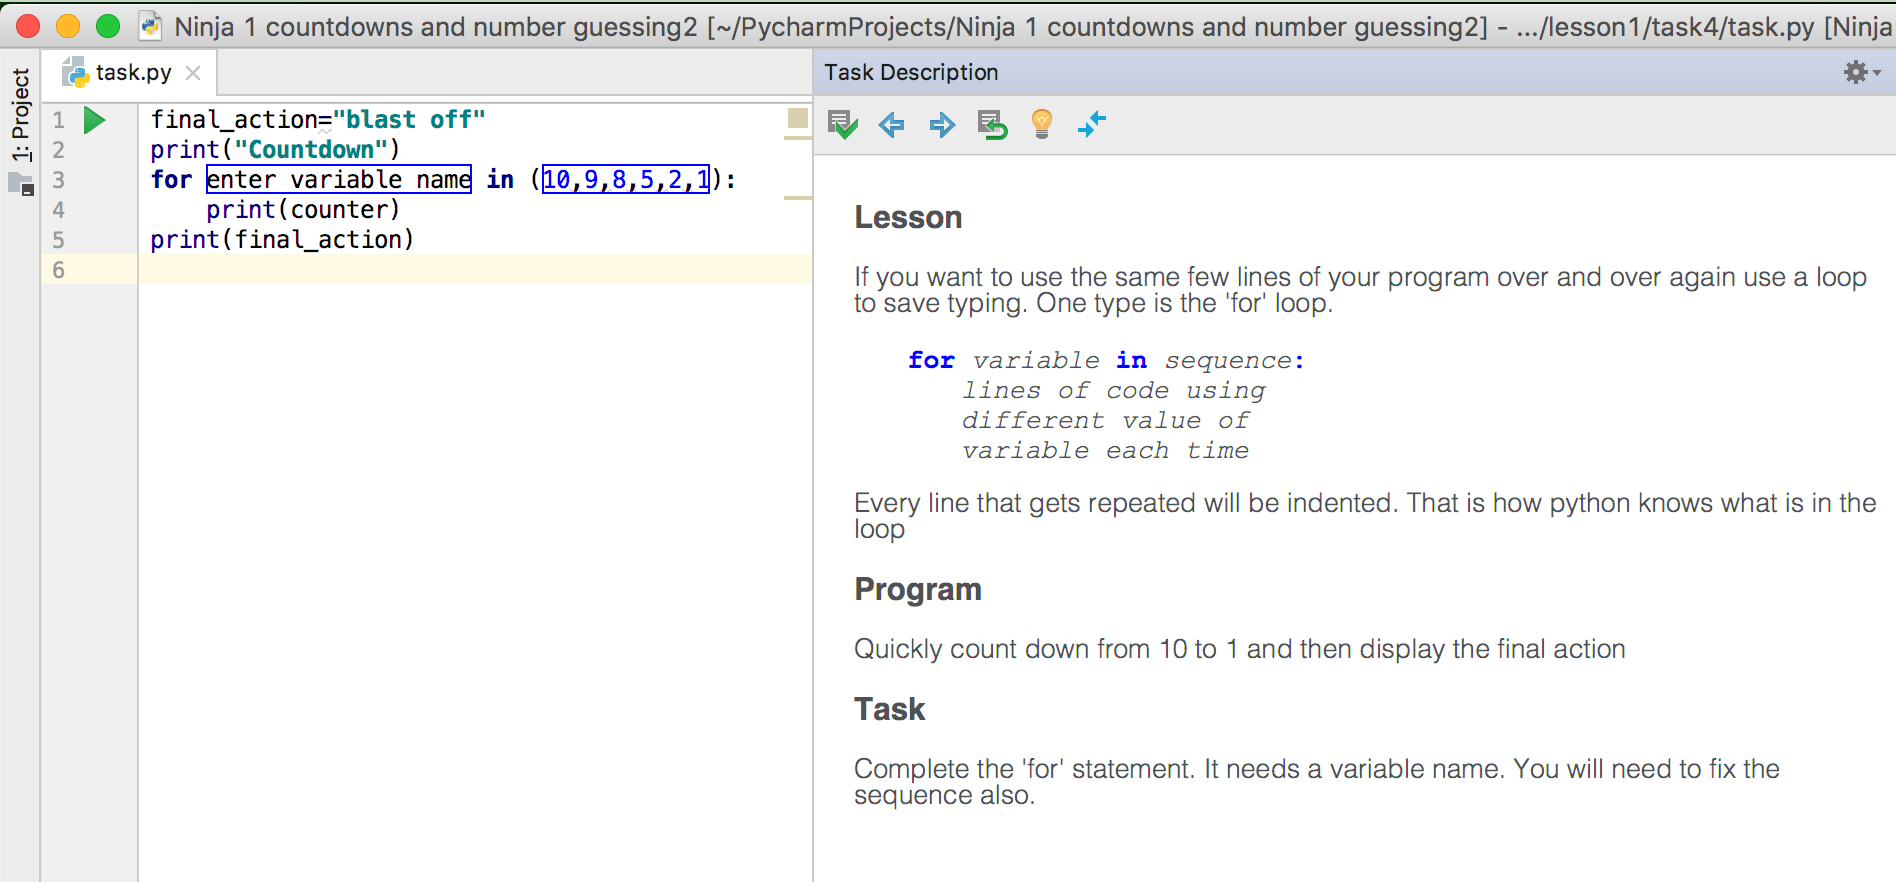
The ninja can see the code for the current task and a task description describing what they have to do. In the diagram below notice the sections of code with thin rectangles around them. These are the answer placeholders that the ninja needs to replace to solve the task. They shouldn’t need to type outside these rectangles, although they can if they want to embellish the program.

While attempting a task they can do the following actions:

  • Get hints on an answer
  • Reset the task to undo all their changes
  • View the answers (after which they must reset the task)
  • Run the program with output going to a local window (ctrl-shift-F10)
  • Check the task which assesses how well they have done by running tests
  • Advance to next or previous task

Advantages of using PyCharm Edu over web python tutorials or text editors:

  • Course can be customised
  • Student learns a proper IDE. Useful for developing bigger python projects later
  • Python console with variable values display
  • Syntax colouring and formatting recommendations
  • Command completion
  • Logic checking such as:
    • variables declared before used
    • import statements used or missing
    • spelling of function names and variable names
  • Python virtual environment support
  • Automatic installation of modules listed in requirements.txt either from pypi or LAN
  • More reliable and functional than Python IDLE
  • Better debugging than Thonny

Problems with PyCharm Edu

I did find some problems with PyCharm Edu. However, Jetbrains have been excellent at responding to my issues in this free software.

  • PyCharm Edu is usable but expect occasional hang or lack of responsiveness.
  • PyCharm Edu turns off a lot of menu items by default to avoid confusing new students. They can be turned back on in preferences.
  • PyCharm Edu and PyCharm Community Edition don’t have the same support for flask or django development found in PyCharm Pro. I was still able to do some flask development.
  • Unable to display local images in task descriptions. This feature is apparently coming in an update due in a couple of weeks.
  • “Play” button for running tasks mostly didn’t work. However, ctrl-shift-F10 achieved the same functionality reliably.

Conclusion

PyCharm Edu is my choice of tool for teaching python and I am sure most of the problems will be addressed in time.

Categories: CoderDojo, Minetest

Python programming course using Minetest

1 Comment

Do you want to learn at home how to program in python while enjoying the fun of building structures in Minetest? These instructions will help you create your own setup similar to the one used at Coderdojo. First of all, make sure you have finished the instructions for the Minetest client install and the Minetest server install.

The steps to configure your course platform:

  1. Install builder_police mod for Minetest.
  2. Install courses in PyCharm Edu

To configure your course platform you will need Internet access to download builder_police from github, ircbuilder python module from pypi.org, and the courses from this website.

To run the course you will need Internet access to a public IRC server (e.g., irc.rizon.net) which handles the communications between your python program and Minetest.

Minetest mods

The following commands are to be typed into Git-Bash (Windows) or Terminal (Mac, Linux). Change directory to the minetest mods directory. If the directory doesn’t exist you may have to create it.

cd Documents/minetest-0.5.0-6cfd699b-irc-win64/mods  # Windows 64 bit
cd Library/Application\ Support/minetest/mods # Mac
cd .minetest/mods                             # Linux
git clone https://github.com/timcu/builder_police.git

Now that you have installed the builder_police mod, you need to enable it in Minetest by selecting “configure” for the world, selecting the “builder_police” mod and clicking the “enabled” check box.

Install courses in PyCharm Edu

    1. Download the following files without unzipping them. Safari users may have to turn off “Open safe files after downloading” in the “General” tab of the Preferences to stop automatic unzipping.
    2. Open PyCharm Edu and select “Browse Courses” from the “File” menu.
    3. Underneath the list of courses, click on the small rectangle with an arrow pointing into it and select “Import a local course”.
    4. Select the downloaded file “Ninja_2_minetest_course_v5.zip”.
    5. Once it has imported you can click on the “Join” button in the bottom right hand corner. Joining a course takes a while because PyCharm will set up a virtual environment for your python programming which doesn’t affect other python programs on your computer.
    6. The virtual environment will detect that you need the python module ircbuilder version 0.0.5 or later and give you an option to install or ignore this requirement. Choose “Install requirement”.
    7. To do the course there are some details you need to set so that your python programs can connect to IRC and Minetest. These details are all stored in a file called “coderdojo.py”. In PyCharm, go to the File menu and select “Open…”. Navigate to your home folder, the folder “PyCharmProjects”, then the folder “Ninja 2 minetest course v5”, select “coderdojo.py” and click “OK”.
mtuser = ""      # your minetest username
mtuserpass = ""  # your minetest password. This file is not encrypted so don't use anything you want kept secret. Can't have spaces in it

# The following must match your settings in minetest server > Settings > Advanced Settings > Mods > irc > Basic >
ircserver = ""   # same as IRC server
mtbotnick = ""   # same as Bot nickname
channel = ""     # same as Channel to join
    1. You need to fill in the values. Here is an example. Of course, you would need different values for mtuser, mtuserpass and channel.
mtuser = "joe"                   # your minetest username
mtuserpass = "mysecretpassword"  # your minetest password. This file is not encrypted so don't use anything you want kept secret. Can't have spaces in it

# The following must match your settings in minetest server > Settings > Advanced Settings > Mods > irc > Basic >
ircserver = "irc.rizon.net"  # same as IRC server
mtbotnick = "mtserver"       # same as Bot nickname
channel = "##minetest3214"   # same as Channel to join
  1. Save this file and you are ready to do the course.
Categories: CoderDojo, Minetest

Minetest server install

If you want to practice at home building Minetest structures with python programs, you will need to install Minetest server with its mods. Before we start, make sure you have completed the Minetest client install.

The steps to configure the server are:

  1. Install git
  2. Install mods. irc, irc_commands, irc_builder, signs_lib
  3. Configure IRC

Git

Windows users will need to download the latest from https://git-scm.com/ and install. This will also install Git-Bash which is a command line shell similar to those on Mac and Linux.

Linux and Mac users should already have git installed. To test, type the following in the Terminal:

git --version

If it is not installed it will give an error message saying “command not found”. Mac users can download the software from the above site or install it using brew as they did with minetest.

brew install git # Mac

Linux users can install using one of the following if it is not already installed.

apt install git # Ubuntu, Debian
yum install git # Fedora, Centos, Red Hat

Luasocket

The irc mod for minetest requires luasocket. This is difficult to install on windows so I have built a 64 bit version of minetest with irc mod and luasocket already built in. It can be downloaded from minetest-0.5.0-6cfd699b-irc-win64.zip.

On Mac, install luasocket using brew and luarocks.

brew install lua51
luarocks-5.1 install luasocket

On Ubuntu install luasocket using apt and luarocks.

apt install luarocks
luarocks install luasocket

Minetest mods

The following commands are to be typed into Git-Bash (Windows) or Terminal (Mac, Linux). Change directory to the minetest mods directory. If the directory doesn’t exist you may have to create it.

Windows 64 bit

cd Documents/minetest-0.5.0-6cfd699b-irc-win64/mods

Mac

cd Library/Application\ Support/minetest/mods
git clone --recursive https://github.com/minetest-mods/irc.git

Linux

cd .minetest/mods
git clone --recursive https://github.com/minetest-mods/irc.git

Windows / Mac / Linux

git clone https://github.com/ShadowNinja/minetest-irc_commands.git
git clone https://github.com/minetest-mods/signs_lib.git
git clone https://github.com/timcu/irc_builder.git
mv minetest-irc_commands irc_commands

Configure mods and IRC

Every Minetest world in which you want to use these mods needs to have them enabled.

  1. Run Minetest.
  2. Select [Settings] tab, then [Advanced Settings] button in bottom left
  3. Expand: + Server / Singleplayer + Security
  4. [Edit] secure.trusted+mods. type in irc
  5. Expand: + Mods + irc + Basic
  6. [Edit] Bot nickname. For example: mtserver
  7. [Edit] IRC server. I like Rizon which has server: irc.rizon.net
  8. [Edit] Channel to join. Choose a unique channel . eg ##minetest3214
  9. Port number can be 6667 and Auto-connect enabled. Channels starting with ## are generally temporary channels. Remember these settings to use in your python program. Make sure your IRC server allows several connections from the same IP address.
  10. From the [Local Game] tab, select your world and click on [Configure]
  11. Select mod on the right and click the “enabled” check box above for each of the four
  12. Click [Save] button to return to [Local Game] tab
  13. Type in a password in green password field and click [Host Game]
  14. Users who wish to build structures from python will need privilege irc_builder. After they have logged in grant them this privilege by typing /grant username irc_builder

Program in Python 3

Now you can start to write programs in Python which will build structures in Minetest. Remember to install ircbuilder python module in your python virtual environment so that your program can communicate with IRC and hence with Minetest. You can do this in PyCharm Edu from Settings (Windows) or Preferences (Mac) > Project > Project Interpreter > + (and type in ircbuilder).

Categories: CoderDojo, Minetest

Minetest client install

THIS PAGE HAS BEEN SUPERCEDED BY Pythonator at QSITE WHICH HAS UPDATED VERSIONS OF EVERY PIECE OF SOFTWARE DESCRIBED HERE!

At CoderDojo this term we will be learning to program in Python 3 to build structures in a Minetest world. Minetest is a free, open-source, high performance Minecraft clone that is easily modded. There already exist mods which allow chat commands to be executed over IRC (Internet Relay Chat). I have created a Minetest mod (irc_builder) to add chat commands allowing us to build structures using those commands. I have also created a python module (ircbuilder) which sends commands through IRC to the Minetest world.

To set up a client computer you only need install three things:

  1. Python 3
  2. PyCharm Edu v2017.3
  3. Minetest v0.4.16

Python 3

Windows or Mac: From the Python website download Python 3.6.4 or later. Install it using the default settings, plus select “Add Python 3.6 to PATH” which is unticked by default.

Linux:

sudo apt install python3 # Debian, Ubuntu
sudo yum install python3     # Red Hat, Fedora, Centos

PyCharm Edu

PyCharm Edu is a free open source integrated development environment (IDE) for Python, better than IDLE which comes with Python. It also can guide students through a course of lessons and tasks, providing hints and checking on tprogress automatically.

Windows, Mac, Linux: Download PyCharm Edu v2017.3 or later from the Jetbrains website. Install using defaults. The courses will be provided as zip files with the names

Ninja_1_countdowns_and_number_guessing
Ninja_2_minetest_course_v6

To open a course

File menu > Browse Courses > Click the green arrow > Import local course > Select one of the above two files > Click Join

Minetest

You can install minetest client without any mods as server mods only need to be installed on the server and then every client can use them.

Windows 64 bit

Download Minetest v0.4.16 (portable 64  bit) from the Minetest website. Extract the zip file to your Documents folder. The program can be run by double clicking on Documents\minetest-0.4.16-win64\bin\minetest.exe

Windows 32 bit

Download Minetest v0.4.16 (portable 32  bit MSVC) from the Minetest website. Extract the zip filet to your Documents folder. The program can be run by double clicking on Documents\minetest-0.4.16-win32-msvc\bin\minetest.exe

Mac

The Mac version of Minetest needs to be installed using Terminal (Applications/Utilities). If you haven’t installed brew, install it first with (one line):

/usr/bin/ruby -e "$(curl -fsSL https://raw.githubusercontent.com/Homebrew/install/master/install)"

Then install minetest from Terminal with:

brew cask install xquartz
brew install minetest

Minetest can be run by double clicking /usr/local/opt/minetest/minetest.app or from Terminal with:

/usr/local/opt/minetest/minetest.app/Contents/MacOS/minetest
Linux
sudo apt install minetest # Debian, Ubuntu
sudo yum install minetest     # Red Hat, Fedora, Centos

Minetest can be run by typing minetest on command line.

Categories: CoderDojo, Minetest

Python in Minecraft 10 – functions and modules

Importing modules

In the previous python in minecraft blog we created a program to construct an east-west tunnel. This is a useful program which we might want to use often. We can put the program into a function and save the function in a module so it can be used by other programs. We will call the function “buildEastTunnel()”. The module name will be just the name of the file, which in this case we will call “tunnel.py”. Then whenever we want to build a tunnel running east west, we can import the module just like we have been importing mcpi.minecraft and mcpi.block.

There are several ways to import functions. The simplest method imports the module but not the function name. We still need to tell python to look in that module when calling the function

import tunnel
tunnel.buildEastTunnel()

If you want to give the module a better name you can use “as” to assign a new name. This is what we do when importing mcpi.minecraft as minecraft.

import tunnel as mole
mole.buildEastTunnel()

If you want to use the function without qualifying it with the module name each time, you can import the function explicitly from the module.

from tunnel import buildEastTunnel
buildEastTunnel()

Function parameters

Now calling buildEastTunnel() as it is currently written will always construct a tunnel in the same place, x = -400 to -200, y = 72 at each end, z = 244. However, if we design the function to take parameters then when we call the function we can specify where the tunnel is built.

# tunnel.py
def buildEastTunnel(mc, x1, x2, y1, y2, z):
    """Builds an east-west tunnel (in the x direction)"""
    # rest of function ...

# example10.py
import mcpi.minecraft as minecraft
from tunnel import buildEastTunnel
mc = minecraft.Minecraft.create()
buildEastTunnel(mc, 0, 200, 75, 75, 233)

This example passes the mc object to the function so it knows which minecraft server to build the tunnel in. Then it gets the x, y and z coordinates at each end of the tunnel. Because the tunnel is running east-west there is only one z value required. Our code is designed to go from xmin to xmax but someone calling our function might put the higher value of x first and the lower value second or vice versa. We can take advantage of python’s ability to assign several variables at once to ensure xmin is less than xmax.

def buildEastTunnel(mc, x1, x2, y1, y2, z):
    """Builds an east-west tunnel (in the x direction)"""
    if x1 < x2:
        xmin, yatxmin, xmax, yatxmax = x1, y1, x2, y2
    else:
        xmin, yatxmin, xmax, yatxmax = x2, y2, x1, y1
    # rest of function ...

When designing a function to take parameters, it is possible to specify some parameters as “required” and other parameters as “optional”. Optional parameters need to be given a default value. In our example it would be useful for the y values to use ground level if it is not supplied. “Required” parameters have to come before “optional” parameters so the parameters list should now be (mc, x1, x2, z, y1, y2).

def buildEastTunnel(mc, x1, x2, z, y1=None, y2=None):
    """Builds an east-west tunnel (in the x direction)"""
    if x1 < x2:
        xmin, yatxmin, xmax, yatxmax = x1, y1, x2, y2
    else:
        xmin, yatxmin, xmax, yatxmax = x2, y2, x1, y1
    if yatxmin == None:
        yatxmin = getGroundHeight(mc, xmin, z)
    if yatxmax == None:
        yatxmax = getGroundHeight(mc, xmax, z)
    # rest of function ...

Finding ground height

We are calling a function getGroundHeight(mc,x,z) which we haven’t written yet. In mcpi.minecraft is a function mc.getHeight(x,z) which finds the highest block which is not air at x and z coordinates. Unfortunately that block will often be a tree or sapling. Here is a function which corrects mc.getHeight(x,z) for trees. It makes use of the mc.getBlock(x,y,z) function which returns the id of the block at those coordinates.

def getGroundHeight(mc, x, z):
    """finds heighest non air block which is also not a tree or sapling"""
    LEAVES2 = block.Block(161)
    y = mc.getHeight(x, z)
    while mc.getBlock(x, y, z) in (block.AIR.id, block.LEAVES.id, block.WOOD.id, LEAVES2.id, block.SAPLING.id):
        y -= 1
    return y
Categories: CoderDojo, Minecraft