Minecraft Pi on the Raspberry Pi can be controlled using python scripts. Here we will set up a Mac, Linux or Windows PC to achieve the same functionality by using the RaspberryJuice plugin with the Spigot Minecraft server.
Requirements
Installation
Installation of Java, Git and Minecraft is straight forward following instructions from sites listed above. Installing Git provides a bash shell for Windows.
Python installation
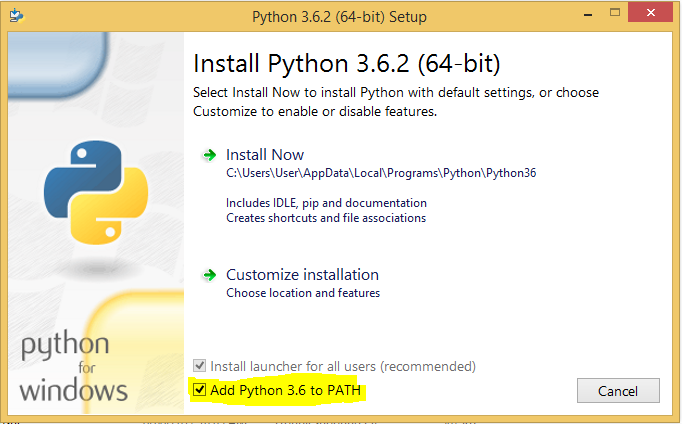
When downloading python, choose Python 3 not Python 2.
When installing python, tick the check box to add python to the path. This makes it easier to run python from the command line, although you will normally run python by starting the application called IDLE. Then click on “Install Now”

To run python on the command line, the command is python3 on Mac and Linux and python on Windows. I will use python3 in these instructions.
Windows only – python installation
To make python3 work in the bash shell on windows, start Git-Bash and type the following command:
echo "alias python3='winpty python.exe'" >> .bashrc
The winpty is required to enable python interactive interpreter to work in git-bash the same way it works in Windows command prompt, so this alias is providing two solutions in one line. Now quit git-bash (by typing exit). Restart git-bash and type python3. You should see something like the following:
$ python3
Python 3.6.2 (v3.6.2:5fd33b5, Jul  8 2017, 04:57:36) [MSC v.1900 64 bit (AMD64)] on win32
Type "help", "copyright", "credits" or "license" for more information.
>>>
If you forgot to click the check box to add python to the path when installing python then it can be added later by going to Control Panel > Uninstall a program and double clicking on the Python program which will be called Python 3.6.2 (64-bit) or similar. Select “Modify” to change your original setup. You don’t need to change the Optional Features so click “Next”. In the Advanced Options click the checkbox now called “Add Python to environment variables” and then click on “Install”.
Spigot minecraft server installation using bash shell
To install Spigot server, use the installer caller BuildTools.jar available from https://hub.spigotmc.org/jenkins/job/BuildTools/lastSuccessfulBuild/artifact/target/BuildTools.jar . Download this file and put it in a folder you want to install the Spigot minecraft folder, then run it using java.
These instructions show how to install using bash shell. You don’t have to use bash shell, but by using bash shell the same instructions work for all platforms. Bash shell is available on Mac OS X (Terminal), Linux (command line or Terminal) or Windows (Git-bash is available after you installed git above).
mkdir minecraft-spigot
mv Downloads/BuildTools.jar minecraft-spigot/
cd minecraft-spigot
java -jar BuildTools.jar
Now edit the file eula.txt and change eula=false to eula=true . This is to acknowledge that you agree with the EULA which is necessary to run the server. You can do this with a text editor from the GUI such as Windows NotePad or Mac TextEdit. Alternatively do it from the command line using vi text editor
vi eula.txt
The vi commands are cryptic. When you start vi you will be in command mode. Use the arrow keys to move the cursor to the line you want to change. Then press the [a] key which is the command to put vi in edit (append) mode. In edit mode you can move the cursor to the word false, delete it with the [delete] key and type in true. To get out of edit mode and back into command mode, press the [ESC] key. You now have to issue the command to write the changed file, and quit vi, which is pressing the following four keys [:][w][q][Enter] .
Return to original directory ready for next step.
cd ..
Install RaspberryJuice
You can get the RaspberryJuice plugin from https://github.com/zhuowei/RaspberryJuice/ using Git.
git clone https://github.com/zhuowei/RaspberryJuice.git
mkdir -p minecraft-spigot/plugins
cp RaspberryJuice/jars/RaspberryJuice-1.9.jar minecraft-spigot/plugins/
Run Spigot Server
Using Terminal or Command Prompt from the minecraft-spigot folder. Your spigot version number may be different.
cd minecraft-spigot
java -jar spigot-1.12.jar
To stop the server, type
stop
as a server command.
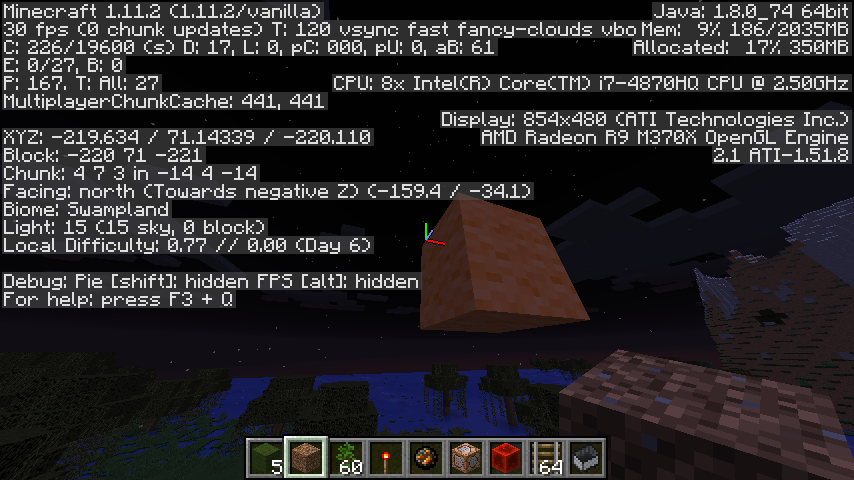
You should now have a configuration file in the RaspberryJuice folder in the plugins folder called config.yml. I like to edit that file and change the
location: RELATIVE
to
location: ABSOLUTE
RELATIVE makes RaspberryJuice behave the same way as Python on Minecraft Pi which uses coordinates relative to the spawn point. However on PCs it is easier to use ABSOLUTE coordinates which equate to the coordinates visible using F3 in Minecraft.
To prepare for the next section, change back up a directory to where we first started.
cd ..
Python mcpi module for RaspberryJuice
To write python scripts you need to install the mcpi module. You can choose the original one, exactly as supplied for Minecraft Pi or the modded one which adds some additional commands. I prefer the modded one. They are included in the files you cloned from github.
The following command tells you where user site-packages should be installed.
python3 -m site --user-site
Use this information to link to the module in the git repository you downloaded. This has to be done for each user on computer who will want to run python scripts.
Mac or Linux using Bash
STARTDIR=`pwd`
PKGDIR=`python3 -m site --user-site`
mkdir -p "$PKGDIR"
cd "$PKGDIR"
ln -s "${STARTDIR}/RaspberryJuice/src/main/resources/mcpi/api/python/modded/mcpi"
cd "$STARTDIR"
Windows command prompt – run as administrator
for /f %a in ('python -m site --user-site') do set PKGDIR=%a
mkdir %PKGDIR%
cd %PKGDIR%
mklink /D mcpi %HOMEPATH%\RaspberryJuice\src\main\resources\mcpi\api\python\modded\mcpi
cd %HOMEPATH%
Now start the spigot server
cd minecraft-spigot
java -jar spigot-1.12.jar
In another bash shell, create a python script to send a chat message. Here is command using vi.
vi mychat.py
import mcpi.minecraft as minecraft
mc = minecraft.Minecraft.create()
mc.postToChat("hello")
Run this script and you should see your message in the first bash shell.
python3 mychat.py
Troubleshooting for Windows
The following tests should be done in Git-Bash:
1. Type python --version. It should return “Python 3.6.2” or similar. If it says “bash: python: command not found” then you have not ticked “Add python to PATH” when installing. See Windows only python installation instructions above for remedy.
2. Type python3. It should start the python interpreter shell ending with >>>. If you not then you haven’t created the .bashrc file correctly. See Windows only python installation instructions. You can delete the existing .bashrc file in your home directory and try creating it again. Be extremely careful with spaces and using the correct type of quotation marks. It is best if you can copy and paste directly from this web site into Git-Bash. To paste in Git-Bash, right click the mouse and select “Paste”.
3. Once you are in the python interpreter shell, type import mcpi.minecraft. If there is an error then there is a problem with the link you created in “Python mcpi module for RaspberryJuice”. Try creating it again.